Results 1 to 13 of 13
-
10th Aug 2018, 12:25 PM #1
 [Guide] Dropshipping Settings And Articles [Alidropship]
Pricing markup formula
All products imported in your store from AliExpress appear with their original prices. To get profit from your business, you need to determine pricing rules and set markups/margins.
AliDropship plugin features a profound system for pricing markup – the amount added to the cost of goods to cover overhead and profit.

To add a new pricing markup rule, click Add New Formula. Select Supplier Cost Range (these are product prices offered by sellers on AliExpress). Assign an arithmetic operation: addition (+), multiplication (x) or equality (=) and enter the value of this operation. If you need additional rules for your formula, you can use Additional Formula option. Formulas can be applied not only to all product categories, but also to certain ones: just select the necessary category from the drop-down menu. Click Save Changesto add your formula.

You can set a priority order for formula that will be applied for the same range amount for a particular category and the rest of your products.
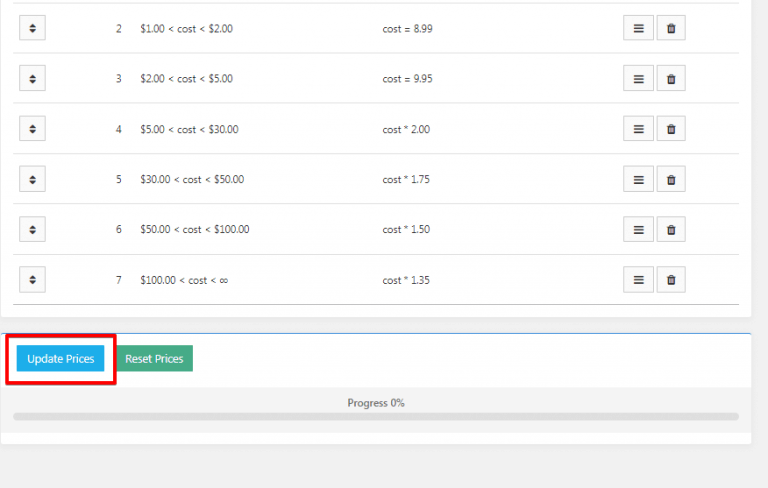
For example, you have formula 5 < cost < 30 * 2 for category Dresses and you have formula 5 < cost < 30 * 1.75 for the rest of your products. In this case you need to put formula for Dresses category higher in Pricing formula list by Drag and drop option, then Update Prices to confirm changes:
After your formula is added, all new products imported into your store will get prices according to your pricing rules. If you need to apply these rules to already existent products on your site, click Update Prices button. To change all product prices back to AliExpress original ones, click Reset Prices.

Please note, you can create as many formulas as you need, use x2, x3, x4 buttons for setting a formula fast and add Recommended formula with ready pricing markup rules. Here is an example:

According to the formula shown on the screenshot, all products with prices on AliExpress between $1 and $5 will be multiplied by two and additional $2 will be added to the final price. So, if we import a product that costs $3 on AliExpress, the price will be converted to $8 ($3 * 2 + $2).
There are also additional discount settings:
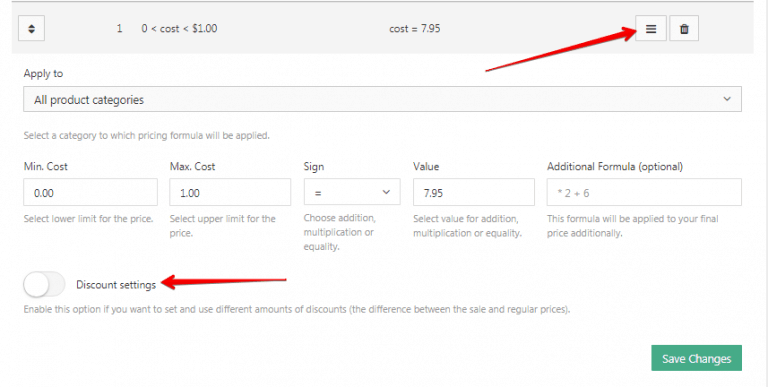
Enable this option if you want to set your own discount amounts for your products.
This option could be enabled in all pricing formulas and could be applied to all product categories or to the particular one.
How it works:
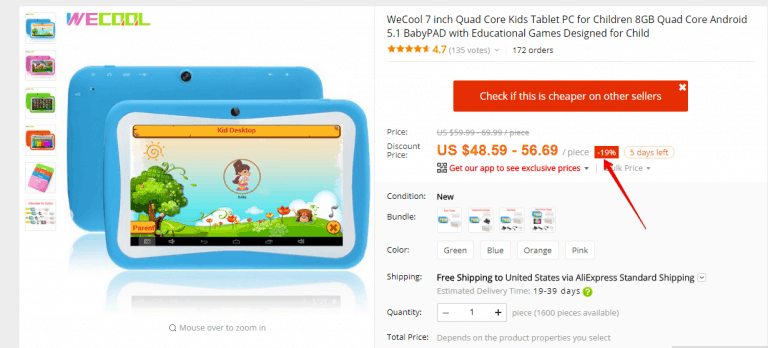
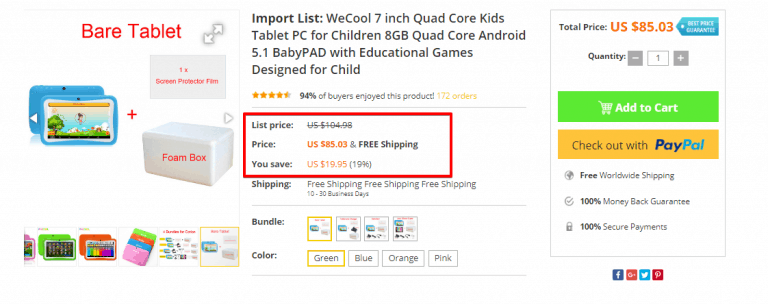
You have a product that initially has a discount of 19% on AliExpress and you want to sell it with 50% discount on your site. Import that product.
According to my pricing formula $30.00 < cost < $50.00 *1.75 = 85.03 (sale price), and 104.98 (regular price) which gives us 19% discount:
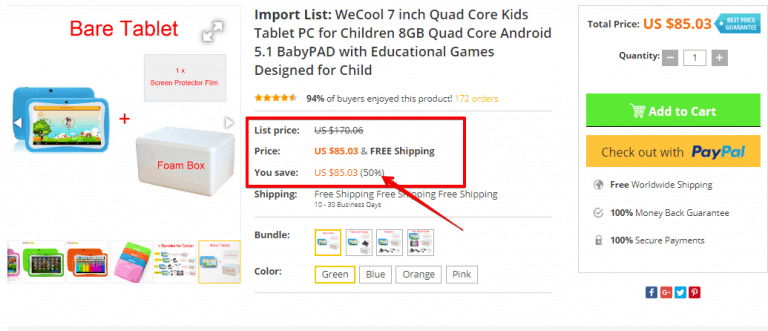
Go to your pricing -> Enable Discount settings -> type 50 in a field-> click Save Changes and Update your prices:
Your discount amount is changed to 50% by increasing the regular price . So, the difference between regular and sale price is 50%.
Prices rounding
With the help of this feature you can round your prices. If this option is activated, for example, such prices like $8.53 and $6,47 will be automatically changed after products price update to $9 and $6, respectively.
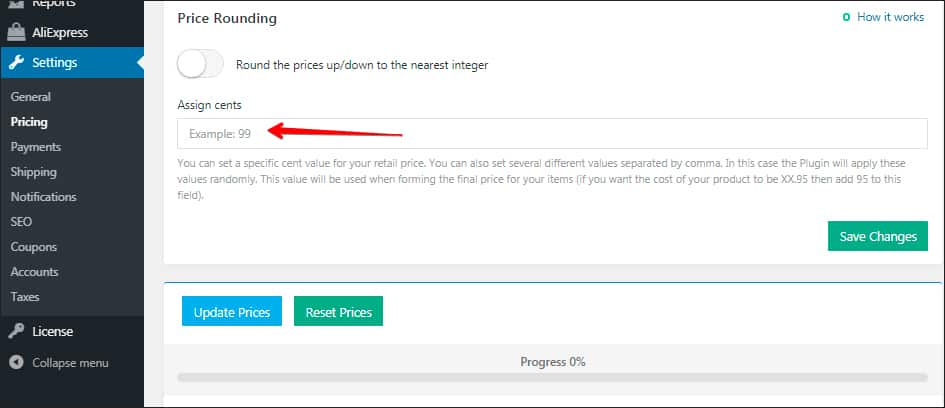
Assign cents
You can set a specific cent value for your retail price. You can also set several different values separated by commas. In this case the plugin will apply these values randomly. This value will be used when forming the final price for your items (for example, if you want the cost of your product to be XX.95, add 95 to this field).
EasyMoney Reviewed by EasyMoney on . [Guide] Dropshipping Settings And Articles [Alidropship] Pricing markup formula https://youtu.be/rYvvYLjUjYY All products imported in your store from AliExpress appear with their original prices. To get profit from your business, you need to determine pricing rules and set markups/margins. AliDropship plugin features a profound system for pricing markup – the amount added to the cost of goods to cover overhead and profit. https://alidropship.com/wp-content/uploads/2017/08/Pricing_.jpg To add a new pricing markup rule, click Add New Rating: 5
-
10th Aug 2018, 12:26 PM #2
Currency settings
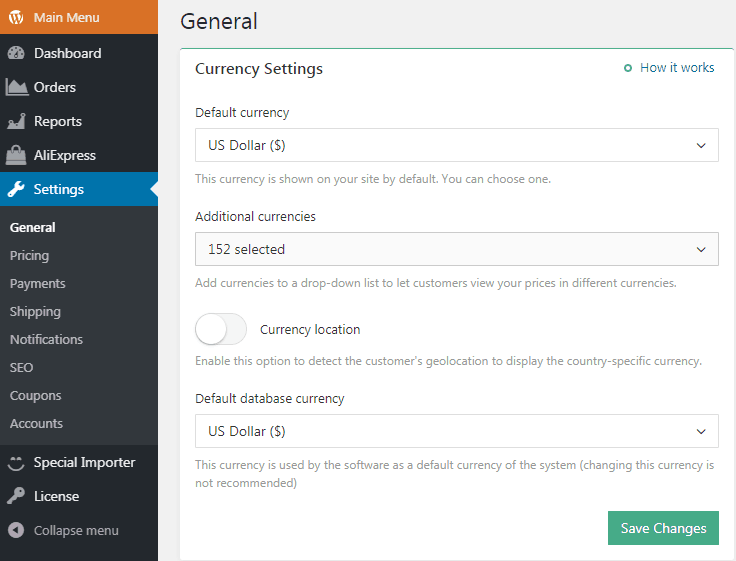
Your currency settings can be adjusted to your needs in AliDropship => Settings => General.
Default currency
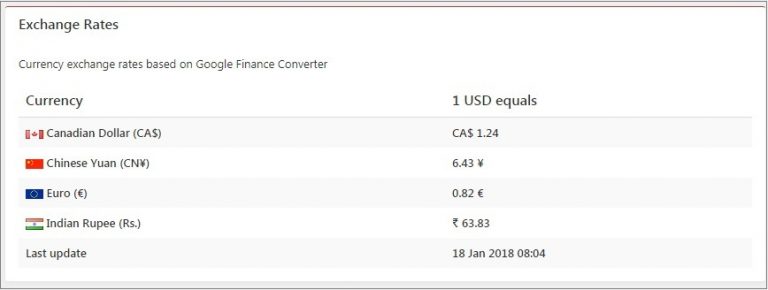
AliDropship Plugin uses US Dollars as a primary currency set by default. You can change it if you plan to work with another currency. In this case all the product prices in US Dollars will be automatically converted into the selected currency according to Google Finance converter. Up-to-date exchange rates can be found next to Currency settings.
Additional currencies
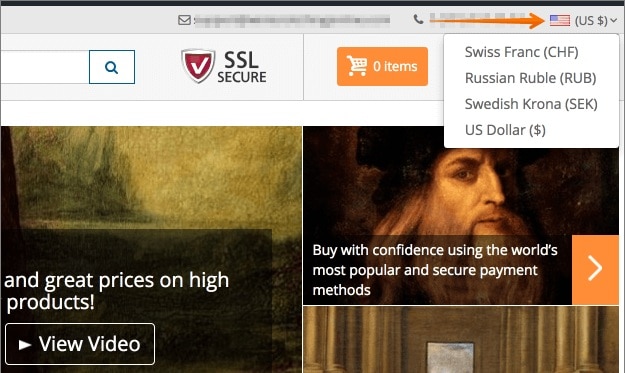
With AliDropship plugin, it is possible to add more currency options so that your customers can choose necessary currency from the drop-down menu in your store.
Currency location
Plugin automatically shows the currency based on customer’s geographical location detected by his IP address.
Default database currency
Database currency is used by the software as your default currency for payment gateways. You should not change this currency once it has been set up as this might negatively affect the way your payment gateway works.
-
10th Aug 2018, 12:27 PM #3
SEO options
In case you do not use any third-party WP SEO plugins on your site, we recommend using SEO tools available with AliDropship plugin. To apply SEO settings, go to AliDropship => Settings => SEO.

sitemap.xml and robots.txt
Activate this option to generate sitemap.xml and robots.txt files. Sitemap is important because it tells the search engines about the content that you have on your site and how often it’s updated. It makes it easier for Google to index your site and show it on search results. A robots.txt is a file at the root of your site that indicates those parts of your site you don’t want accessed by search engine crawlers.
SEO meta data fields
If this option is enabled, SEO meta data fields will be added to every product on your site. You can enter data in these fields to make your product pages look more SEO friendly.
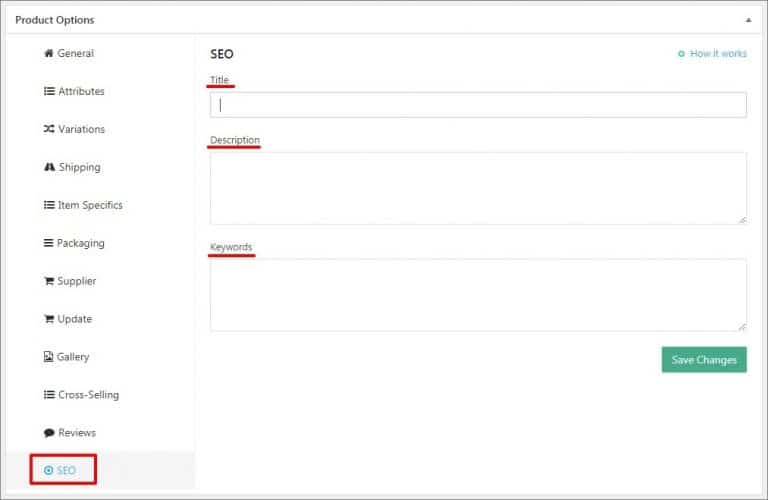
SEO meta data generator
Turn on this option to generate SEO meta data for your product pages automatically.
Home page SEO meta data settings
Meta Titles and Meta Descriptions are hidden text elements on your page that are used to describe your site on search engines. These elements are meant to give a small taste of what your site is about for people who have come across your page by way of a search engines.

Meta Titles and Meta Descriptions are hidden text elements on your page that are used to describe your site on search engines. These elements are meant to give a small taste of what your site is about for people who have come across your page by way of a search engines.

-
10th Aug 2018, 12:27 PM #4
Creating coupons
Using coupons can be a powerful marketing tool for your dropshipping online store. If you want to create a coupon, go to AliDropship => Settings => Coupons and click Add new button.

Enable a coupon and change its name if you want.

To set the value of your discount, first choose the discount type (% Discount or $ Amount), and then enter a percentage or monetary value for the discount.
You can specify how many times you want this coupon to be used by entering a number in the field Usage limit.

It is possible to set a minimum order amount for a coupon. For example, you can use this option if you want the coupon to be used only in case your customer’s total purchase reaches $10 (like on the screenshot below).

You can set the Start and End dates for your marketing campaign, on which a coupon will be valid. Or you can select Never expires option to make your discount offer run permanently.

You can select which products a coupon can be applied to. There are 3 options:
- to all products
- to selected products
- to selected categories

You can enable option to apply a coupon both to product and shipping costs. Save settings.

-
10th Aug 2018, 12:28 PM #5
reCAPTCHA
To prevent robots from registering on your website we recommend using such tool as ‘reCAPTCHA‘:
reCAPTCHA is a free service that protects your website from spam and abuse. reCAPTCHA uses an advanced risk analysis engine and adaptive CAPTCHAs to keep automated software from engaging in abusive activities on your site. It does this while letting your valid users pass through with ease.
First, you need to register:
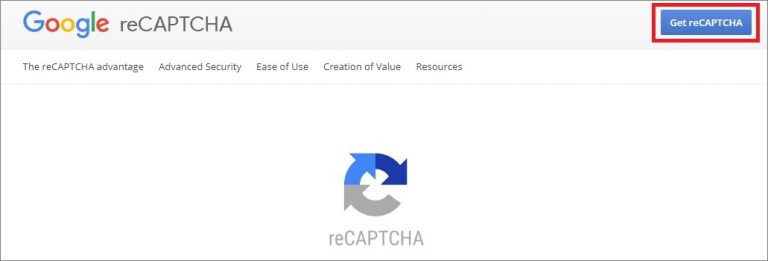
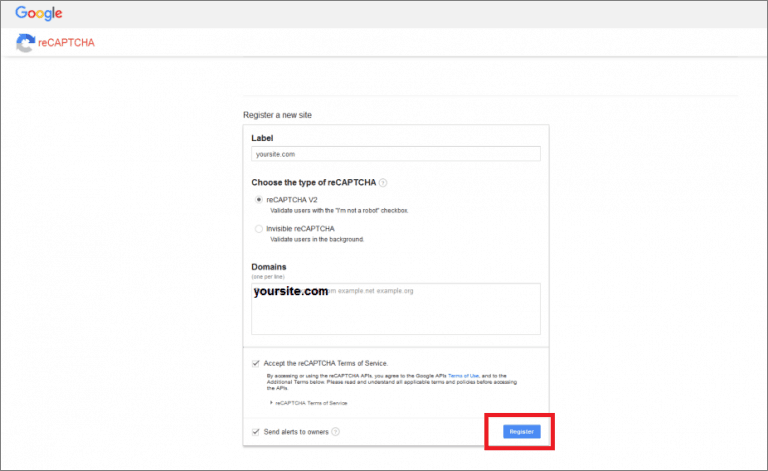
Copy ‘Site key’, ‘Secret key’ and ‘URL’.
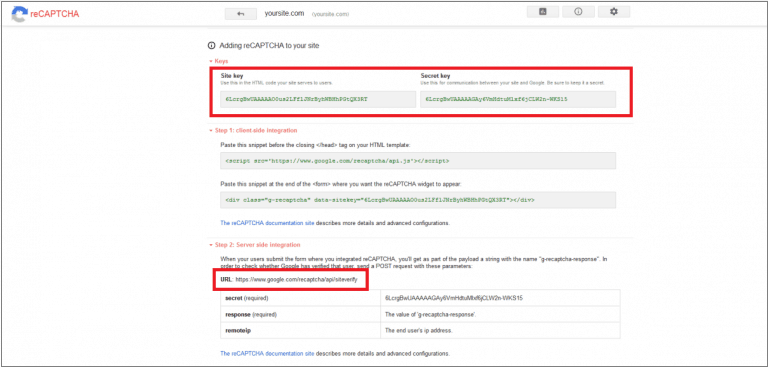
Insert them in your WordPress admin area: AliDropship => Settings => Accounts => ReCAPTCHA. Click Save Changes.
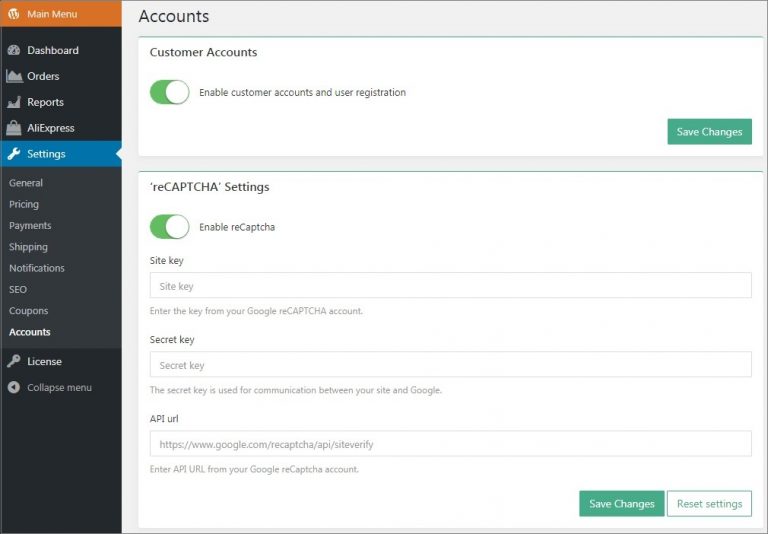
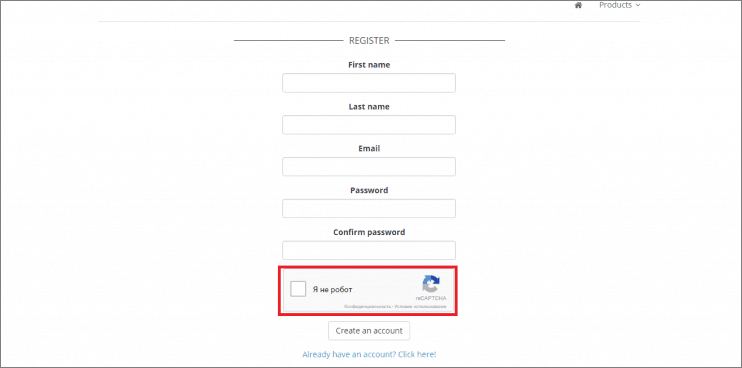
You may check reCAPTCHA icon on your registration page:
-
10th Aug 2018, 12:29 PM #6
Facebook authorization
With Facebook Login option, you can provide your customers with a secure, fast and convenient way to log into your website without them having to create a password. To get started, visit https://developers.facebook.com/
Create or enter your account on Facebook for developers and click Add a new app:
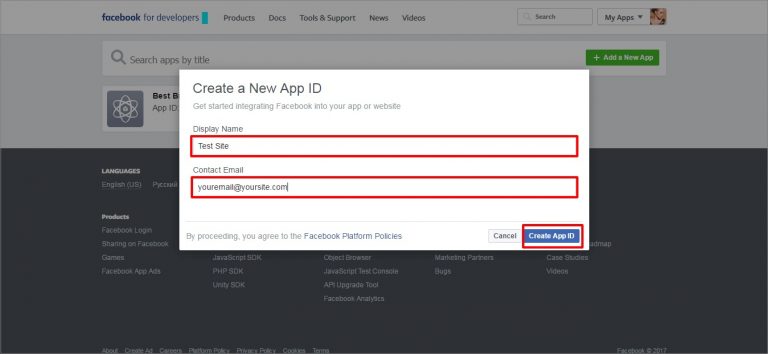
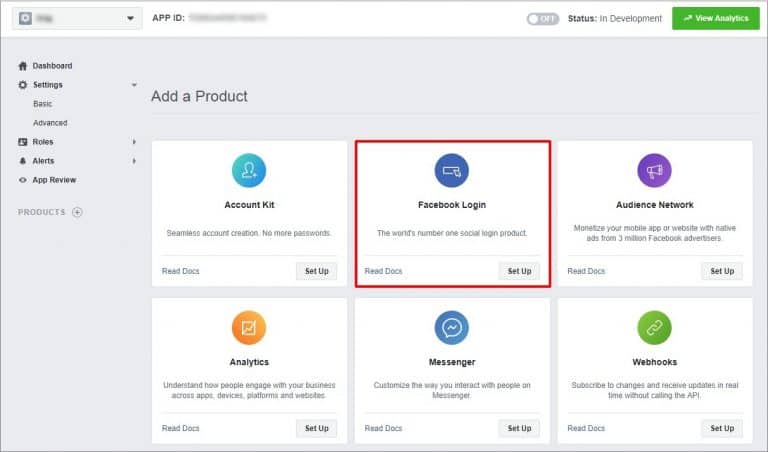
In the Products section add a new product and select Facebook Login. Click Set Up.
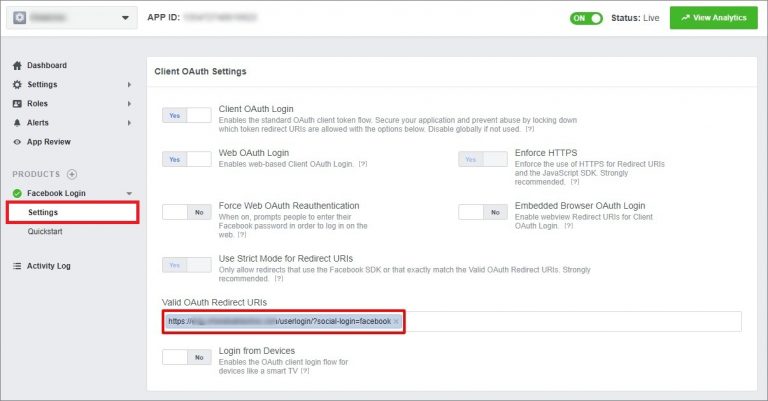
Go to Settings in the left sidebar and add your website URL: yoursitename.com/userlogin/?social-login=facebook in the Valid OAuth redirect URIs field and click Save changes (you may leave all other fields blank).
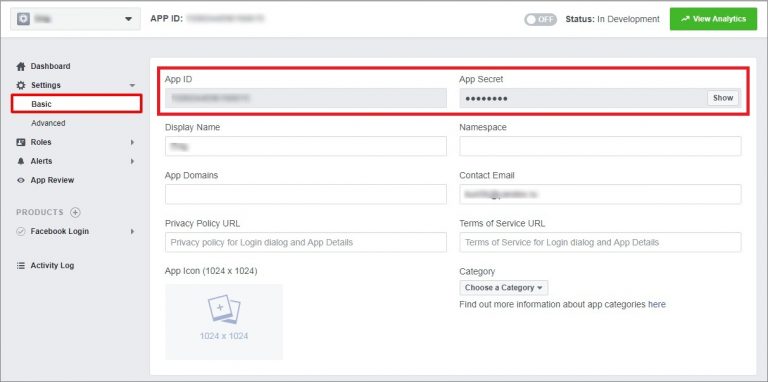
Go to your Settings => Basic. Copy your App ID and App Secret.
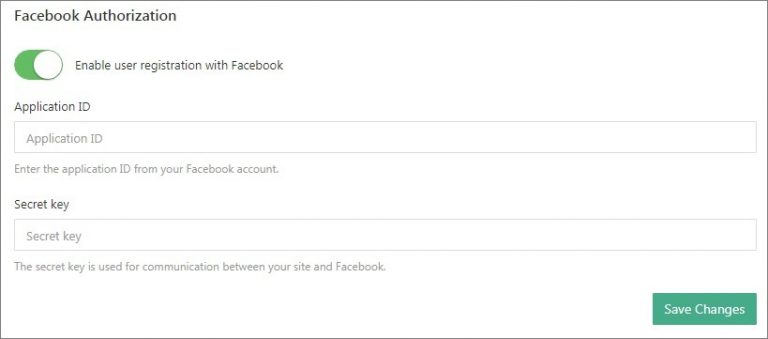
Paste them in your WP admin area: AliDropship => Settings => Accounts.
The last step is activation of your App on Facebook. Go to App Review and make your website public. Click Confirm to finish.


-
10th Aug 2018, 12:29 PM #7
Twitter authorization
Twitter authorization option allows your clients to log in to your website by signing in with their Twitter account. This secure, fast and simple experience leads to higher conversion. To get started,
Go to Twitter Application Management. Log in to your Twitter account or sign up for a new one.

Click Create New App.

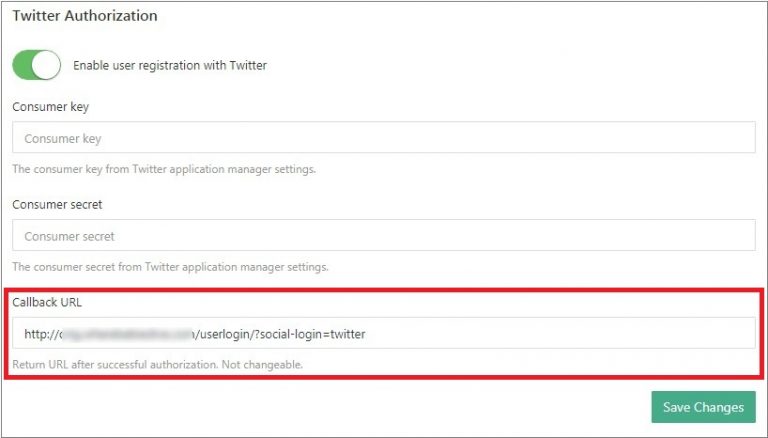
Fill out the required fields (Name, Description, Website) an add your Callback URL. Click Create your Twitter application to continue.
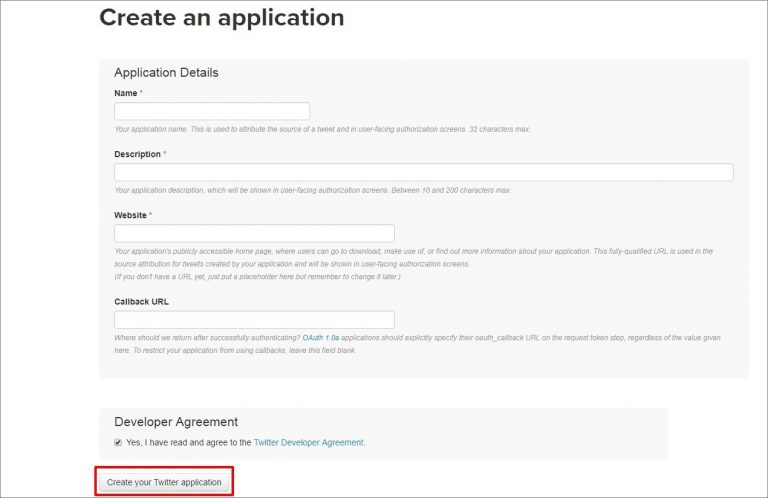
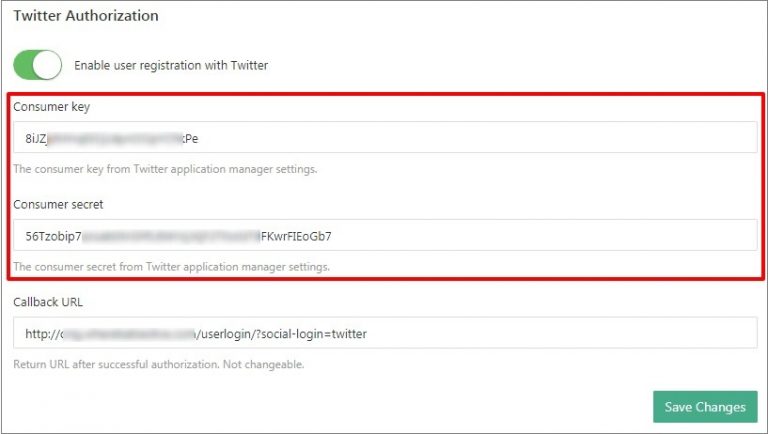
Callback URL can be found in your WP admin area. Go to AliDropship => Settings => Accounts => Twitter Authorization.
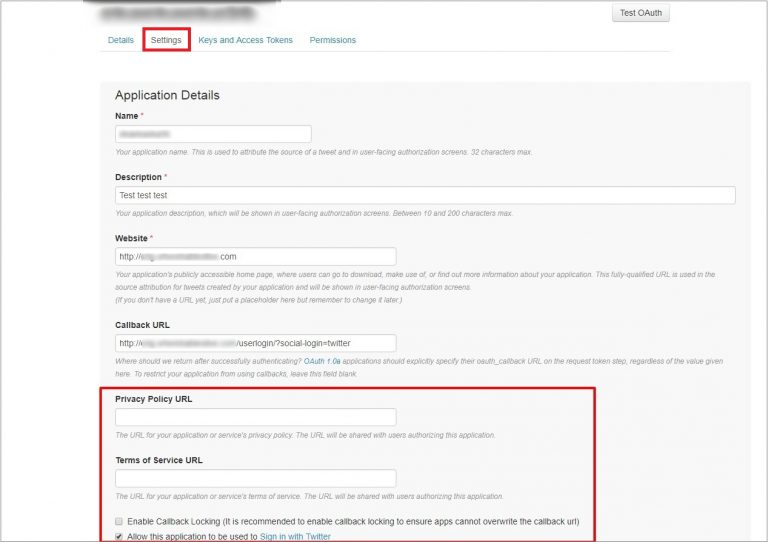
Go Settings and insert Privacy policy URL and Terms of Service URL of your site.
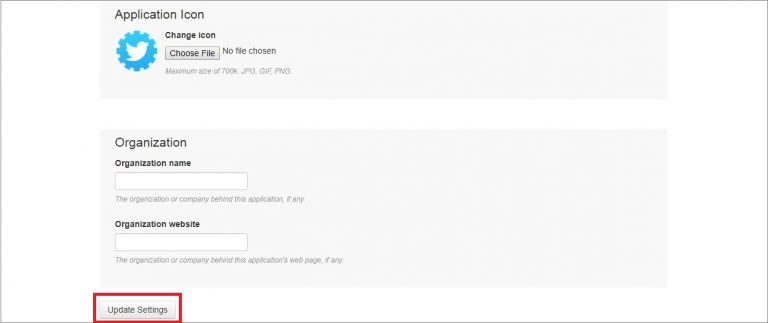
Add your application icon and your organization details (optional). Click Update Settings.
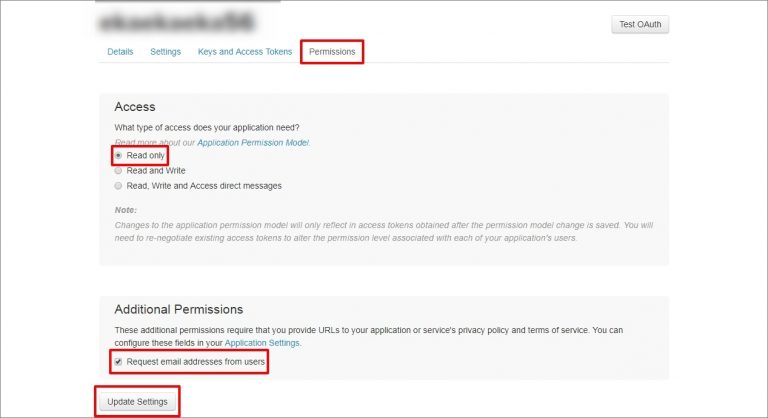
Go to Permissions and select ‘Read only access’, enable ‘Request email addresses from users’ and click Update settings.
Go to Keys and Access Tokens and copy Consumer Key and Consumer Secret.
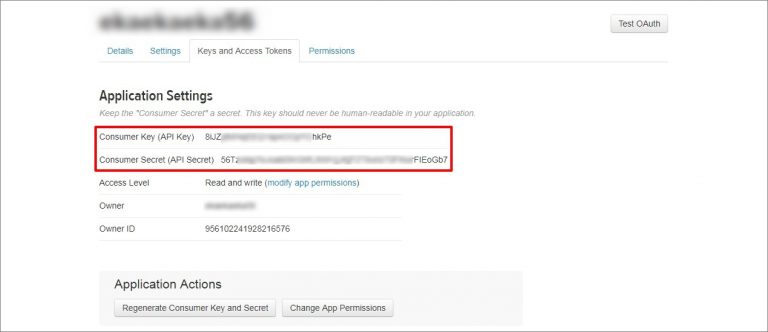
Paste your credentials in AliDropship => Settings => Accounts => Twitter Authorization. Save changes.
-
10th Aug 2018, 12:29 PM #8
Google + authorization
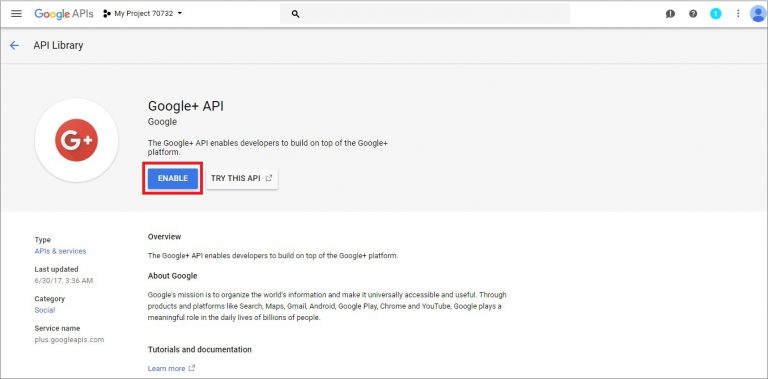
With Google Sign-In, you can enable your customers to log into your website by signing in with their Google account. This secure, fast and simple experience leads to higher conversion. To get started, visit Google API Library and select Social APIs => Google+ API.

Create a new project.

Add your Project name and hit Create.

Continue by clicking Enable.
Then you need to create credentials.

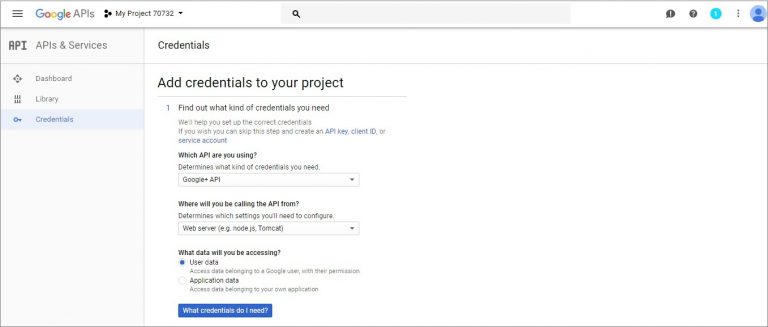
Add credentials to your project.
- Which API are you using? – Google+API
- Where will you be calling the API from? – Web server (e.g. node, js, Tomcat)
- What data will you be accessing? – User data
Once all the fields are filled, click the What credentials do I need? button to continue.
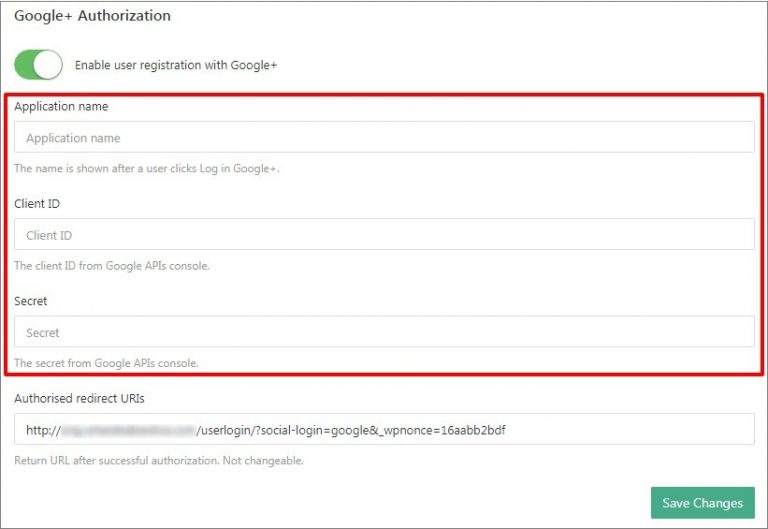
Enter your Authorised redirect URLs that can be found in your WP admin area.
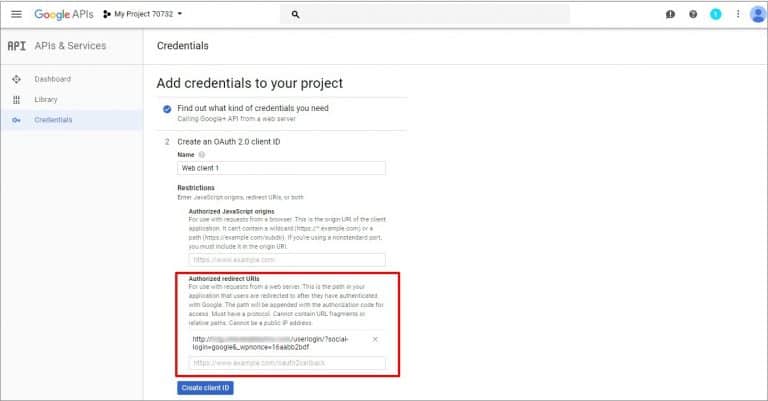
Go to AliDropship => Settings => Accounts => Google+ authorization settings and copy Authorised redirect URIs link. Paste it in your Google settings (see the screenshot above).

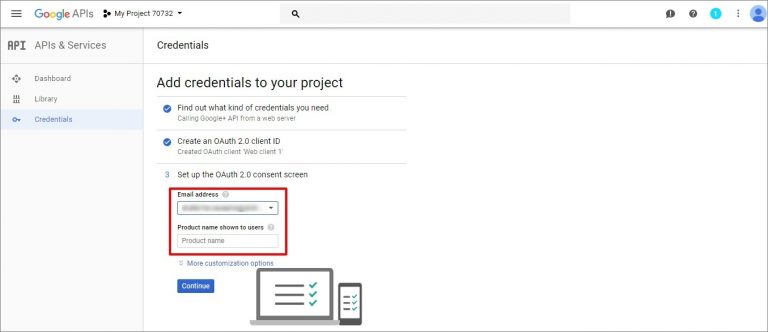
Set up the consent screen by providing your email address and adding product name which will be shown to users. Click Continue.
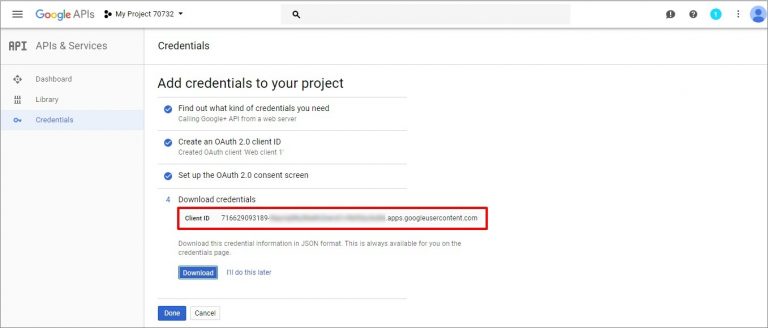
Download your credentials (Client ID). Click Done.
To check your credentials, click on your Name. You may use the Edit button to make changes.

Copy your Client ID, Client Secret and Name.
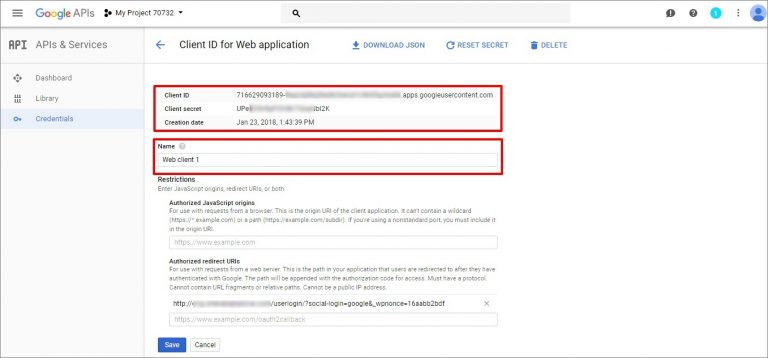
Add your credentials in AliDropship => Settings => Accounts => Google+ authorization settings. Save changes.
-
10th Aug 2018, 12:30 PM #9
Traffic report
If you want to check all your traffic stats on site dashboard, you need to integrate your Google Analytics code into the plugin.
If you do not have a Google Analytics account, you can easily create one for free on the Google Analytics website.
How to create Google Analytics account.
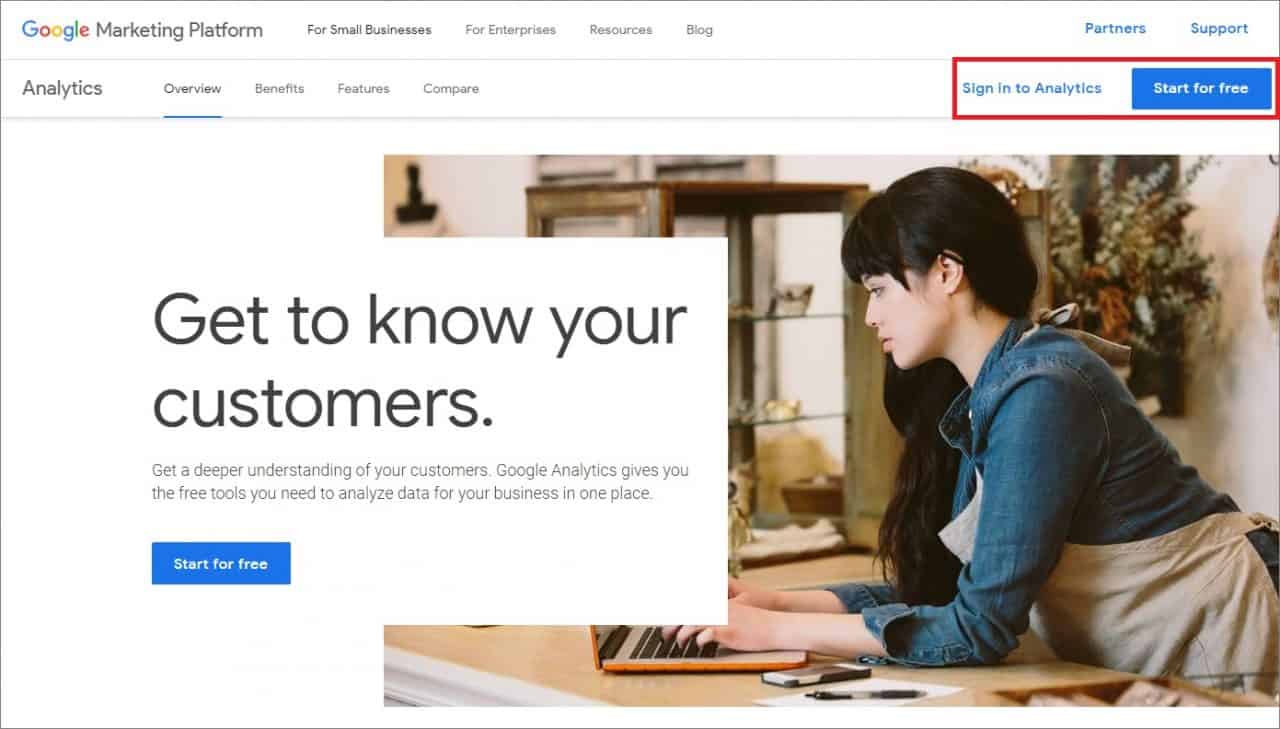
Click here to access Google Analytics. If you have a Google account, and are not signed in, click Sign in to Analytics. If you do not have a Google account, choose Start for free.
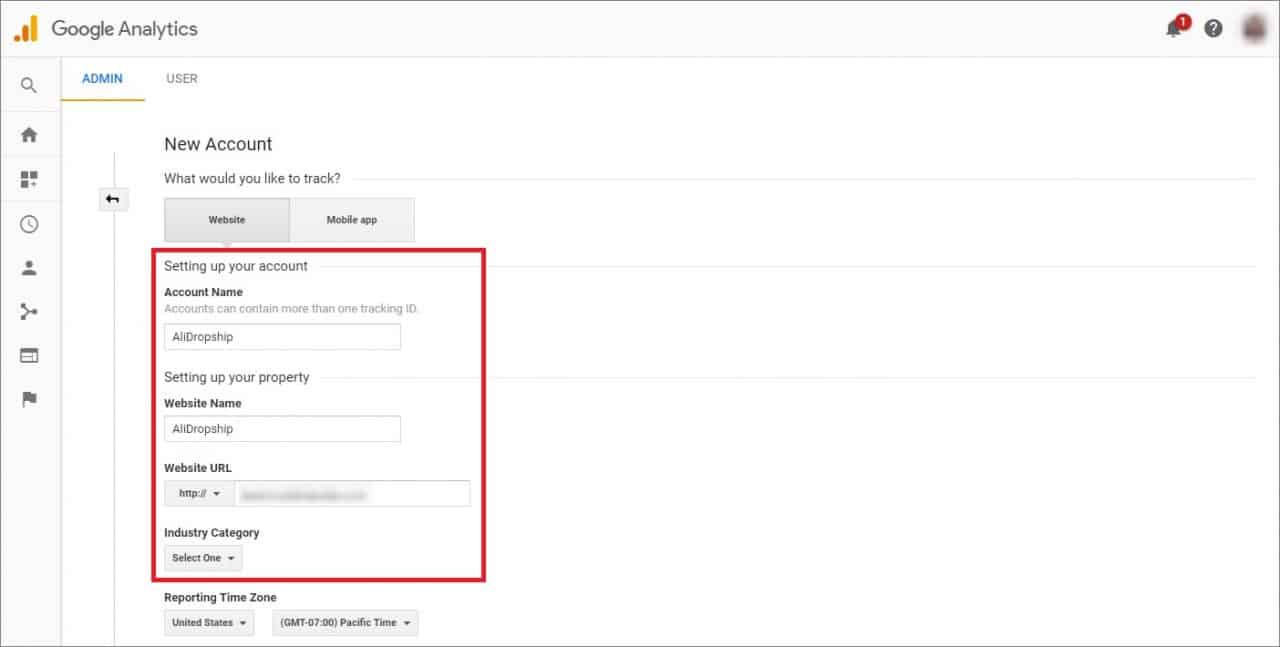
Once you have signed in to your Google account, fill in your Account Name, Website Name, Website URL, and select an Industry Category and Reporting Time Zone.
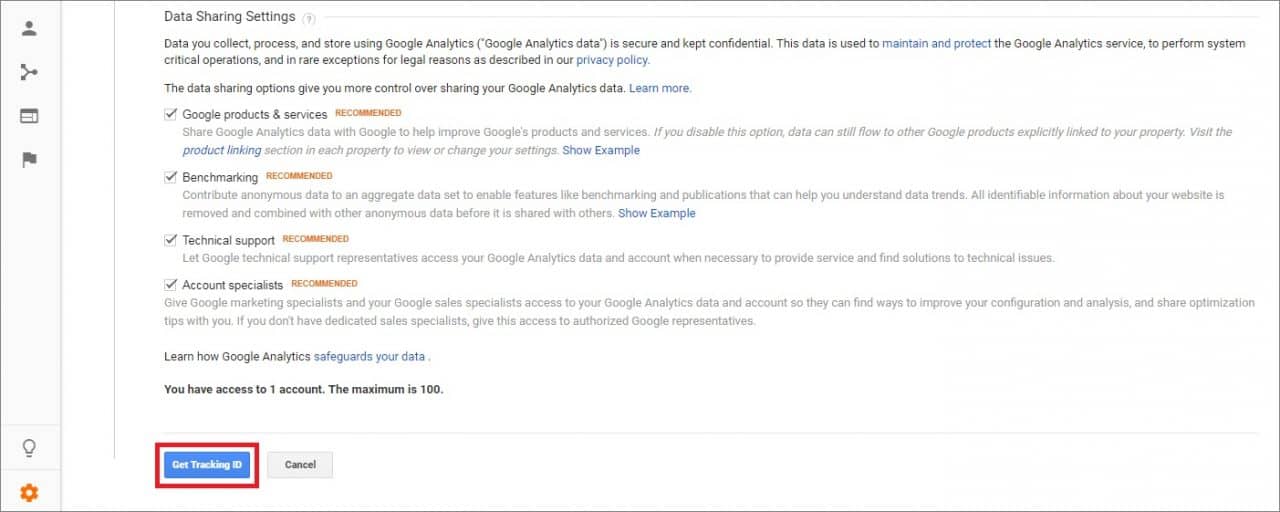
Under Data Sharing Options, check the boxes next to the options that you want to control. Click Get Tracking ID.
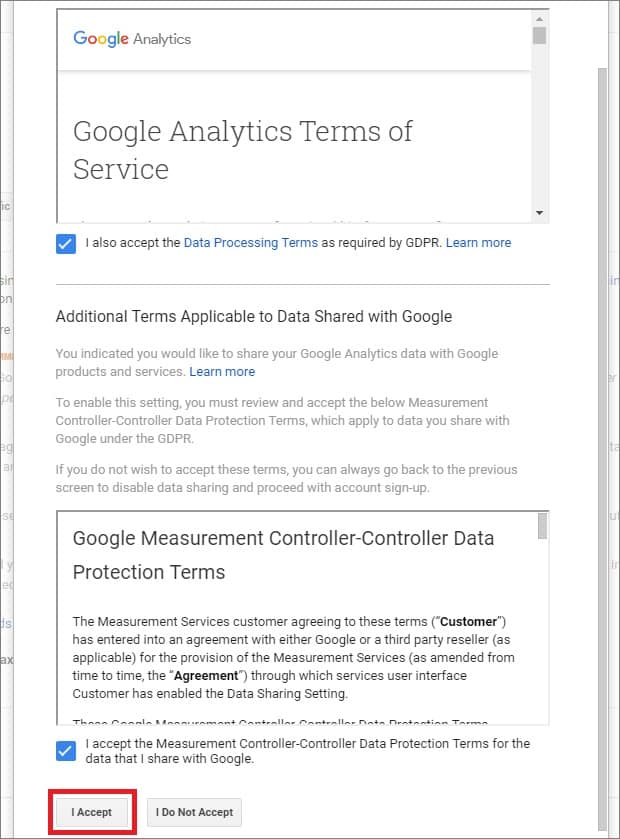
From the Google Analytics Terms of Service Agreement that opens, click I Accept.
How to integrate Google Analytics into your website.
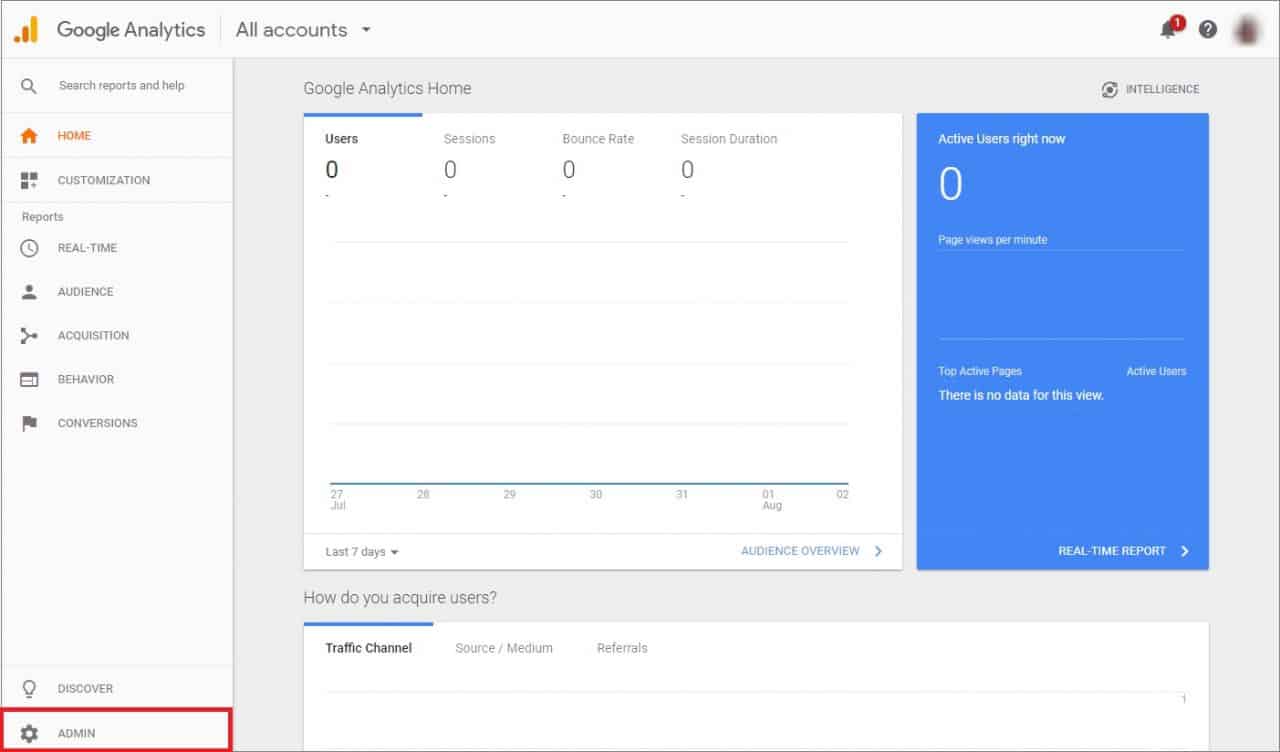
Sign in to your Google Analytics account. Click Admin at the bottom of the page.
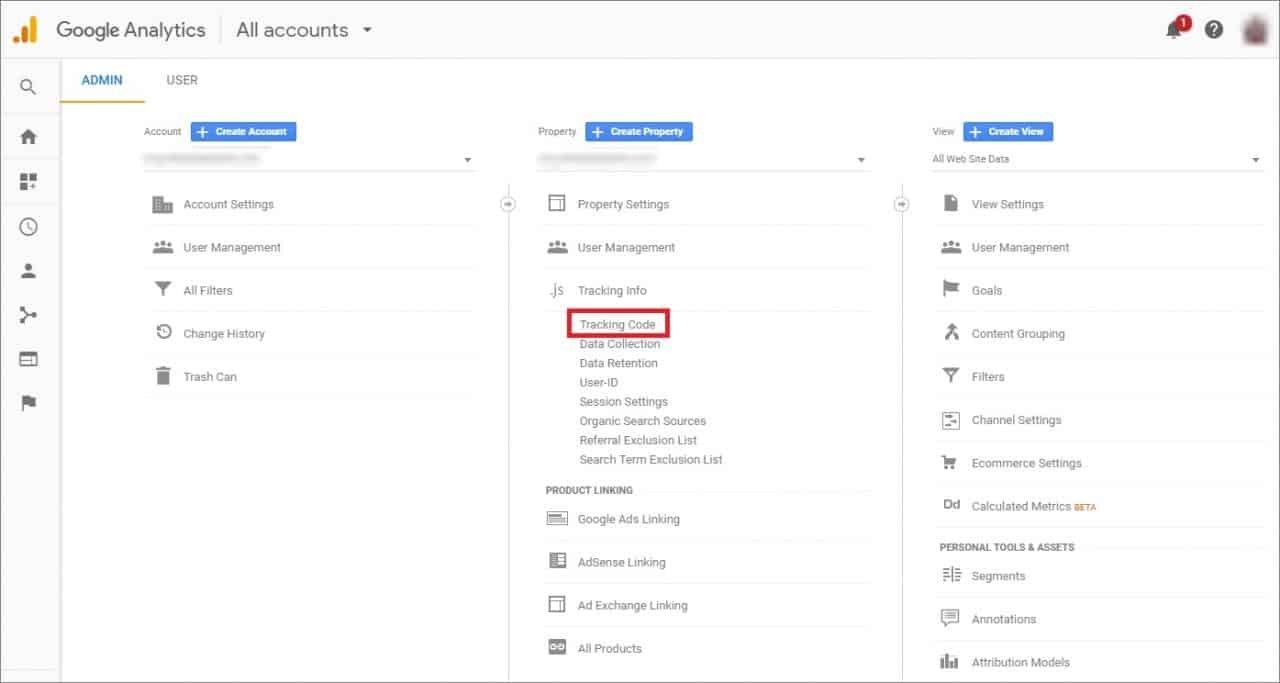
Go to the Property section => Tracking Info. Click Tracking Code in the drop-down menu.
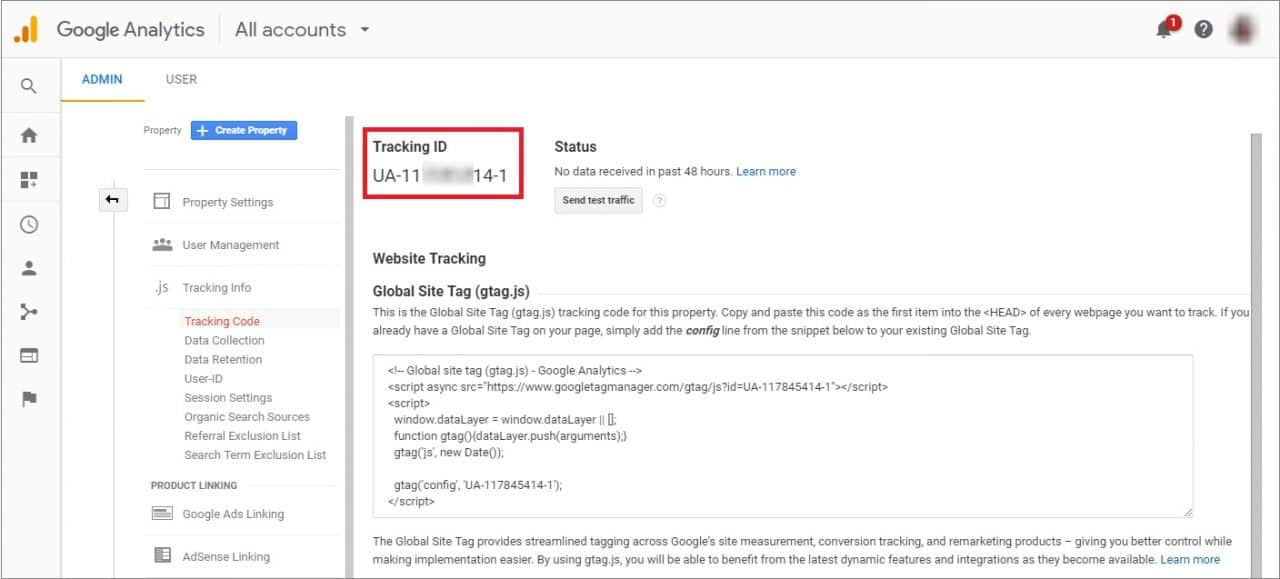
Copy the code below Tracking ID.
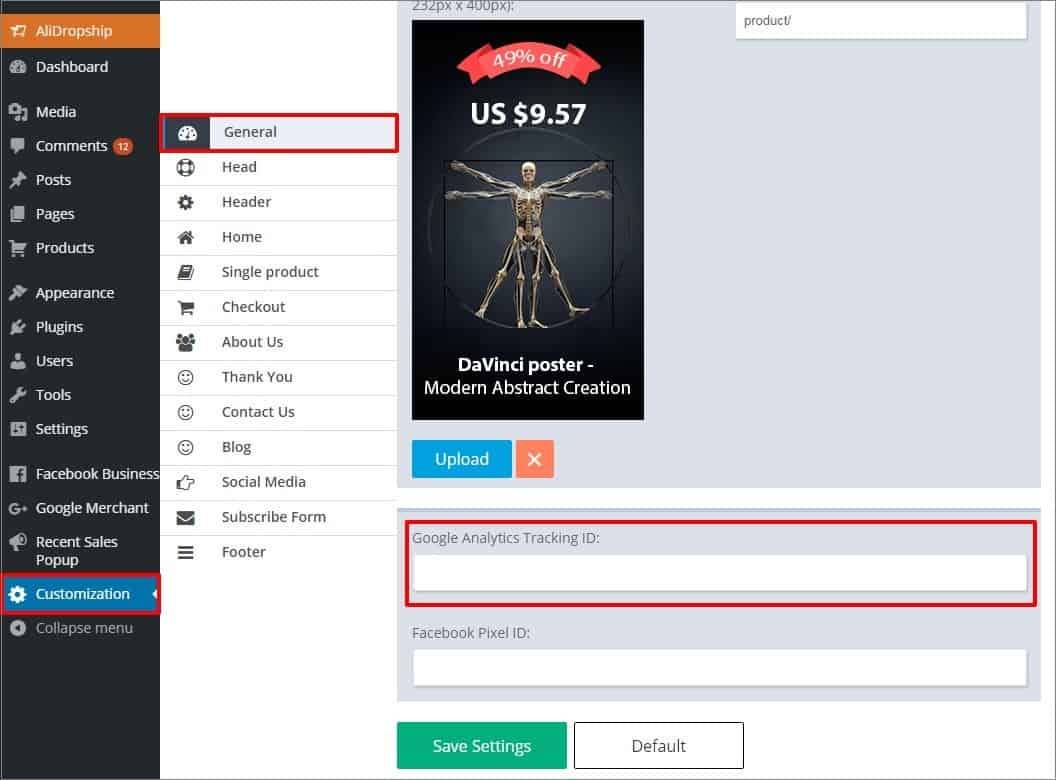
Go to your site WP dashboard => Customization => General and add your Tracking ID. Click Save Settings.
How to make Google Analytics live stats show on your dashboard.
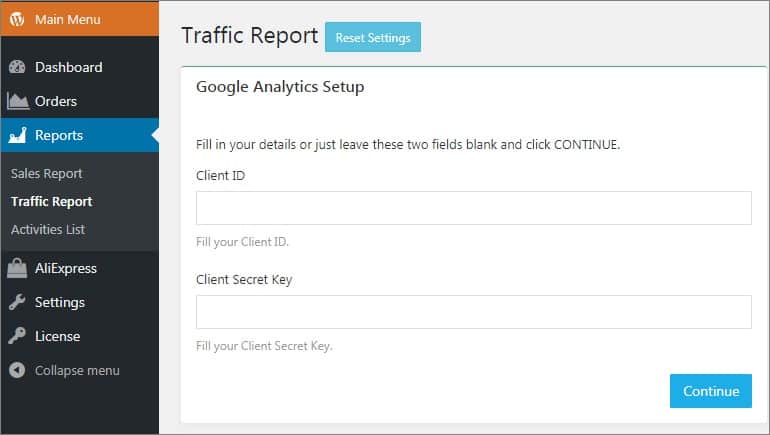
1. Go to WP dashboard => AliDropship => Reports => Traffic Report. Fill in your Client ID and Client Secret Key (if you want to connect to Google Analytics using your Google APIs ) or just leave these fields blank and click Continue.
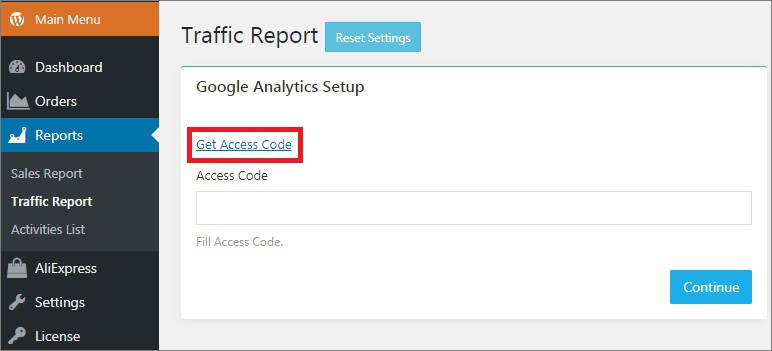
2. On the next page click the Get Access Code link.
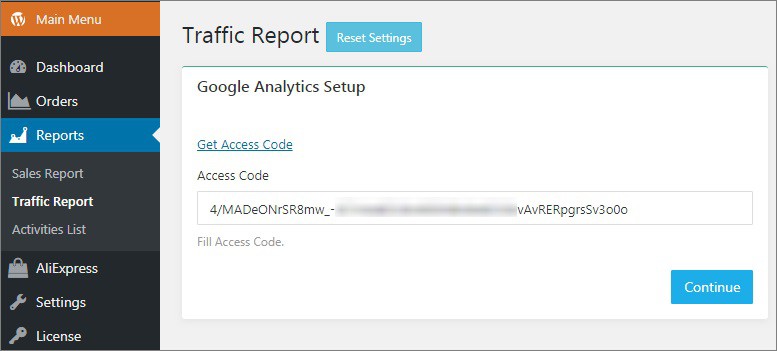
Sign in your Google account. Click the Allow button. You will see your access code.

Copy this code, switch back to AliDropship dashboard and paste it here. Click Save Changes.
3. Select your website and click Continue.

DONE!
-
10th Aug 2018, 12:31 PM #10
Setting customer accounts
To provide your customers with the possibility to create accounts in your store, you need to enable this option in AliDropship => Settings => Customer Accounts.

Once this option is activated, your clients will be able to create an account at the end of checkout process.
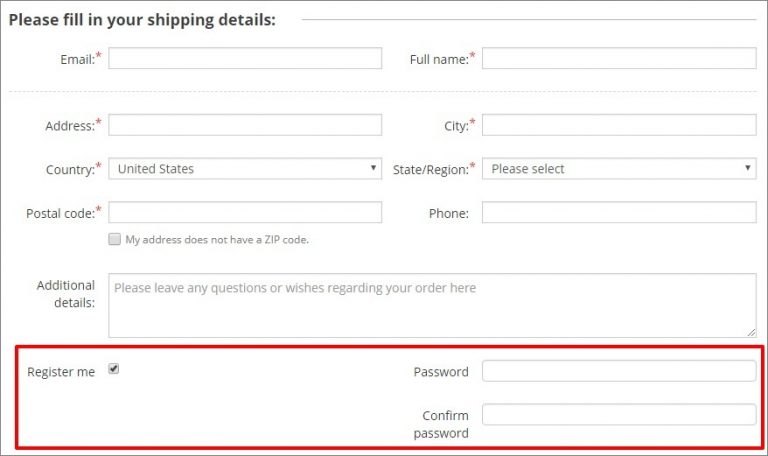
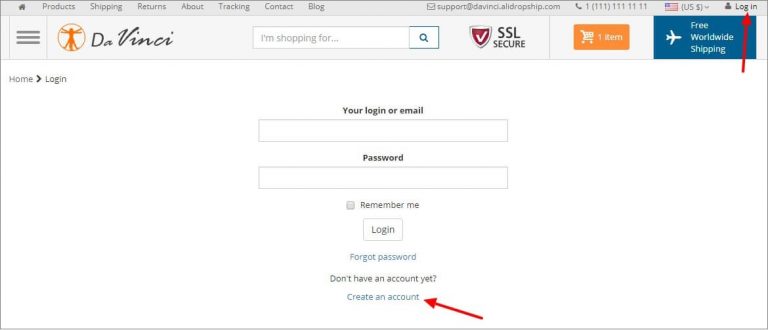
Your customers can log in to their accounts by clicking Log in in the top right corner of the page or create a new one.
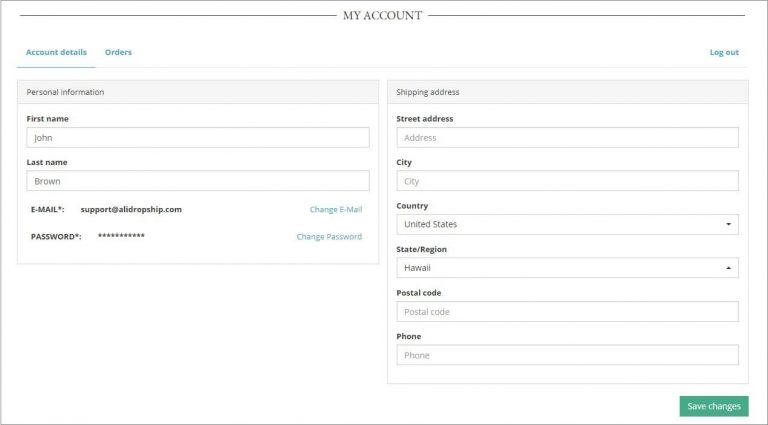
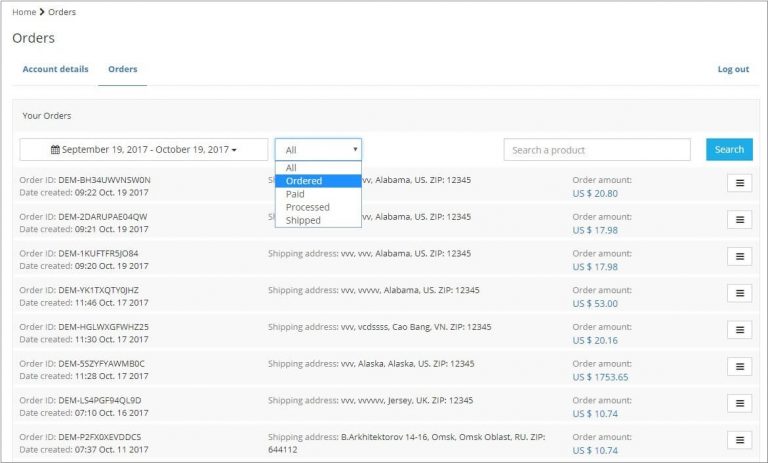
Your customers can store their contact/shipping details, check list of products they purchased and track status of orders.
Your customers may access their personal accounts using their social media profiles:
reCAPTCHATo prevent robots from registering on your website we recommend using such tool as reCAPTCHA:
reCAPTCHA is a free service that protects your website from spam and abuse. reCAPTCHA uses an advanced risk analysis engine and adaptive CAPTCHAs to keep automated software from engaging in abusive activities on your site. It does this while letting your valid users pass through with ease.
First, you need to register:


Copy Site key, Secret key and URL.

Insert them in your WordPress admin area: AliDropship => Settings => Accounts => ReCAPTCHA. Click Save Changes.

You may check reCAPTCHA icon on your registration page:

-
10th Aug 2018, 12:31 PM #11
Tax settings
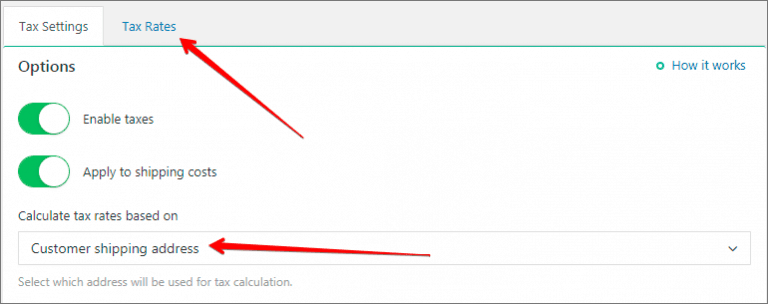
To access the tax settings, go to AliDropship -> Settings -> Taxes and enable taxes.

Activate ‘Apply to shipping costs’ option if you want to charge sales tax both on products and shipping.
There are two ways to calculate your taxes:
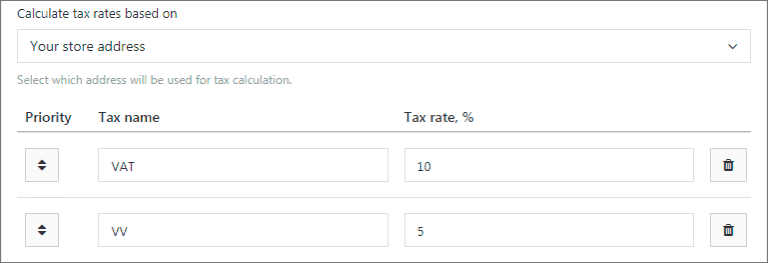
1. Based on your store address: set up your tax name and tax rate in % according to the tax regulations of you country.
2. Based on customers shipping address: set up tax rules for targeted countries/regions/cities. Leave fields ‘State’ and ‘City’ empty if you want a particular tax to be applied to the whole country. Once a customer reaches your checkout page and fills shipping details, the system applies taxes you have set for a particular location automatically.

There are also two ways to display prices:
1. Excluding taxes: in this case you will see a separate line on checkout page with the name of the tax rate. All prices in your store are shown excluding taxes.


2. Including taxes: in this case all prices in your store are shown including taxes. Information about tax rate will be shown on checkout page after the total amount (in brackets).

-
10th Aug 2018, 12:32 PM #12
Sales report
There is a simple way to track you sales and analyze the key indicators of your business. Go to AliDropship => Reports => Sales report.
Set a time period that you want your sales report to be shown:

First, you see Summary that shows you the total revenue for a certain period, the number of unique visitors, the number of orders and items, and finally conversion rate – a percentage of website visitors who make purchases in your store.

Second, you can find all figures in Sales chart using filter By revenue or By orders.

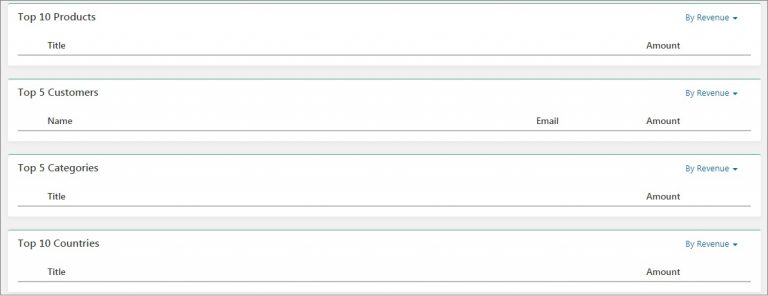
There are also Top 10 products, Top 5 customers, Top 5 categories, Top 10 countries sections where you can filter information either By revenue or By orders.
This rating is based on your sales.
-
11th Feb 2019, 03:12 PM #13
 MAILCHIMP Integration
In your Mailchimp account, go to Lists => Signup Forms => Embedded Forms.

Choose the Horizontal embedded signup form design option.

Copy the underlined code snippets.

Go to your WP admin panel => Customization => Subscribe Form.
Paste the first 'action' snippet after the 'form' word.
Add the style snippet above the Subscribe button part of the code.

You may remove the optional part of the code. Your code might look like this:

Sponsored Links
Thread Information
Users Browsing this Thread
There are currently 3 users browsing this thread. (0 members and 3 guests)
Similar Threads
-
A Beginners Guide to Cryptocurrency Investing
By EasyMoney in forum Crypto Speculation and InvestingReplies: 7Last Post: 3rd May 2019, 11:21 AM -
Power Of Content - Beginners Guide
By EasyMoney in forum Cloaking and Content GeneratorsReplies: 0Last Post: 2nd Oct 2017, 01:08 PM -
Litecoin mining software guide
By EasyMoney in forum Mining and PoolsReplies: 0Last Post: 1st Oct 2017, 03:13 PM -
[GET] The Ultimate Shopify Dropshipping Facebook Ads Course
By AliKashif7 in forum Udemy 100% FREE for LIMITED TIMEReplies: 0Last Post: 10th Jan 2017, 02:49 PM -
[How To] Amazon or Ebay Dropshipping Done Right! *Explained
By EasyMoney in forum Dropshipping & Wholesale HookupsReplies: 0Last Post: 6th Oct 2015, 04:21 PM





 Reply With Quote


 Staff Online
Vn5socks.net 09-11-2024 | socks 5...
Live | 162.210.197.69:59621 | United States |...